Crafty Skins AI
Note: This project is a work in progress.
Most AI models can’t make a Minecraft skin you can actually use in the game. Try asking Midjourney or DALL-E for one. No matter how clever your prompt is, you’ll just get a picture of a character, maybe in a Minecraft style, but not a skin file that works.
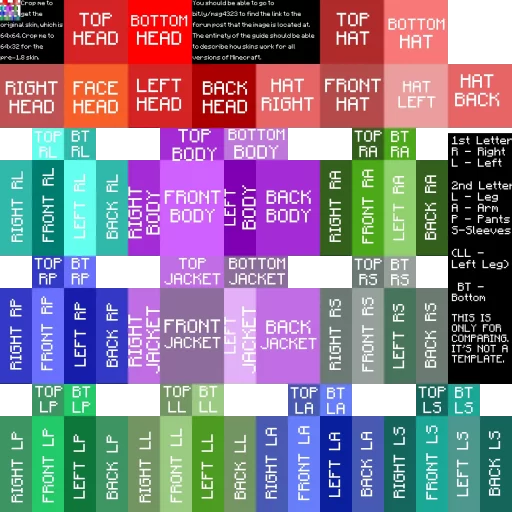
Minecraft only accepts skins in a very specific format: a 64×64 px or 64×32 px UV map that wraps correctly around the player model. If the layout is wrong, the game won’t load it.
Here’s the technical spec if you’re curious.
This project is about bridging that gap. It uses today’s best image generation models to make skins that aren’t just pretty pictures, but playable.
Credit: This project closely follows the methodology outlined in Cory Spencer’s excellent article “Digging into Stable Diffusion-Generated Minecraft Skins” from Monadical. The composite image dataset preparation technique was very helpful in my own fine tuning. I attempt to build on top of his work by adding image conditioning to the model.
What a Minecraft Skin Actually Is
Before we go further, it helps to know what a Minecraft skin really is.
Building a Dataset
There is no ready-made dataset of photos paired with Minecraft skins, so I had to build one.
Scraping Skins from the Web
I scraped just over 1,000 skins and their descriptions from MinecraftSkins.net. After removing broken or very low-effort skins, I ended up with 962 usable samples.
Turning Skins Into Training Pairs
A 64×64 skin file does not look like much on its own. It is just a block of colored pixels. I wanted my model to learn how those pixels map to the 3D character shape, so I created a composite image for each skin.
Each composite is a 1024×1024 image with two parts:
- Top half: A scaled-up version of the raw UV map
- Bottom half: Front and back isometric renders of the Minecraft character wearing that skin
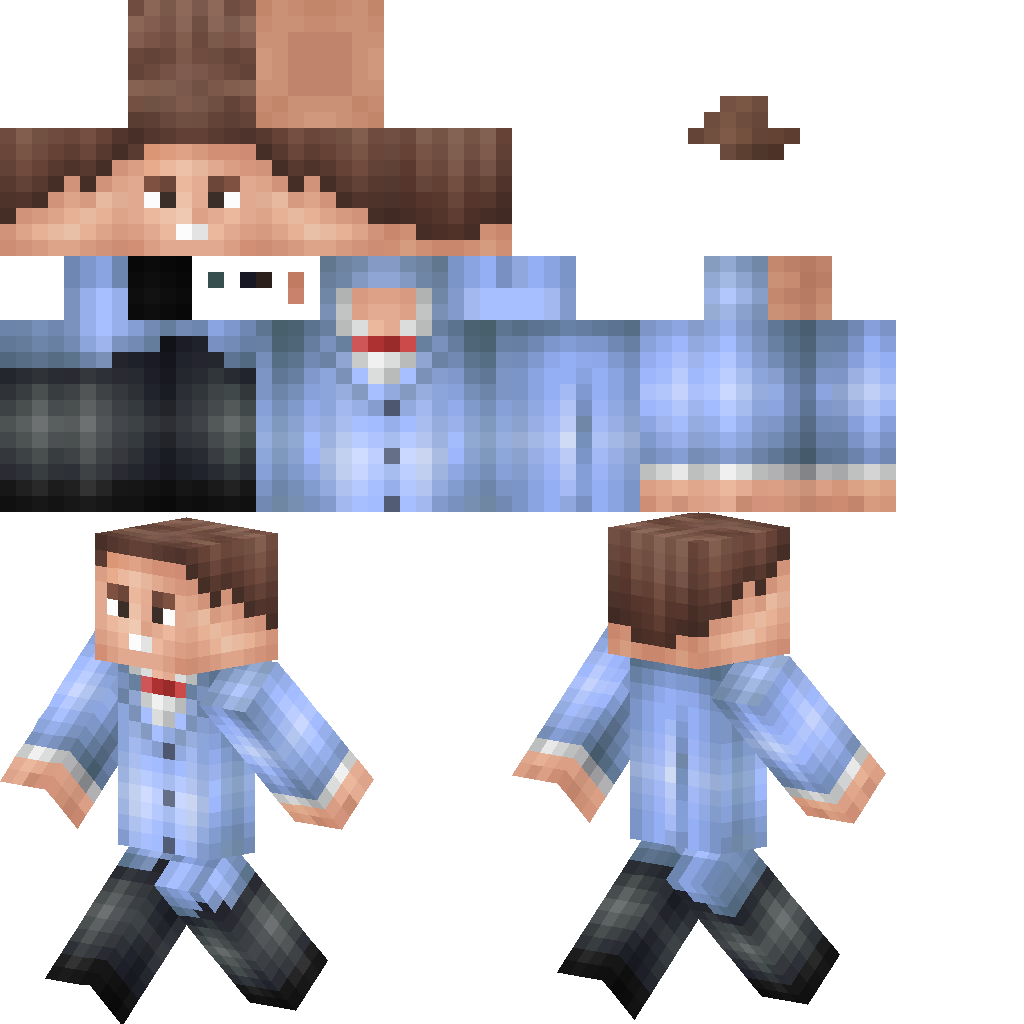
Composite training image of Bill Nye the Science Guy.
This gave the model both the abstract layout and a concrete example of what the skin looks like on a character.
During training, the model sees the entire composite and learns the mapping between the skin’s pixel layout and the rendered character. At inference time, I crop the top half, scale it back down to 64×32, and use that as the final output.
Generating Reference Images
To add richer data, I also generated photorealistic versions of each skin. I wrote a script that sends the skin and its description to OpenAI’s multimodal GPT-4o model and asks it to create a realistic rendering using DALL-E.
I originally planned to train on these images too, but I ended up not using them. The final training used only the skin and its text description, with an IP Adapter guiding the output. If I revisit this project with a different architecture, I may experiment with adding these images back in.
Once the dataset was complete, I converted everything to parquet format and published it on Huggingface so others can explore it.
Training and Using IP Adapters
The most promising approach was to use an IP Adapter to guide generation from a reference image. I blended two IP Adapters, which helped the model pick up more details from the input.
Results
| Reference Image | Model Output | Skin Preview |
|---|---|---|
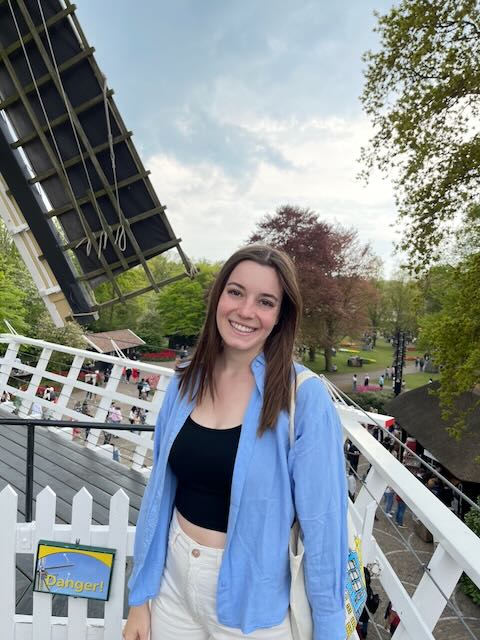 |
 |
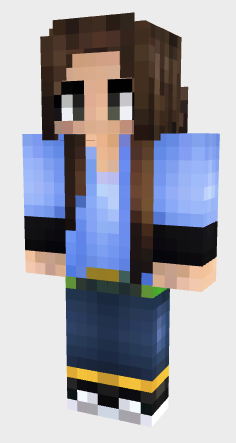 |
Future Work
Two directions I plan to explore:
- Better Model and Data
Clean the dataset, expand it with more examples, and experiment with fine-tuning a larger model. If I change the architecture, I might reintroduce the photorealistic images as a third conditioning input. - Productionization
Build a simple front end where someone can upload an image and get a ready-to-use skin back.
Making It Fast
Speed is not critical for a proof of concept, but it would be fun to make it fast enough to feel interactive.
Two ways to get there:
- Distillation
Techniques like Adversarial Diffusion Distillation or LCM-LoRA can teach a smaller model to generate results in very few steps. - Hardware Optimization
Exporting the model to TensorRT and running it on NVIDIA GPUs would maximize throughput.
I have paused this part of the project for now. TensorRT is still tricky on my hardware (RTX 5090 with limited sm_90 support), and WSL2 with NVIDIA Docker does not always share CUDA libraries cleanly. I kept notes and resources for when I revisit this later with a more refined model.
Takeaways
Even though the results are not perfect, this project taught me a lot about today’s SoTA image generation research.
Once I have a better dataset and a more robust pipeline, I want to build a web app so anyone can turn a picture into a Minecraft skin that works out of the box.
Experiments
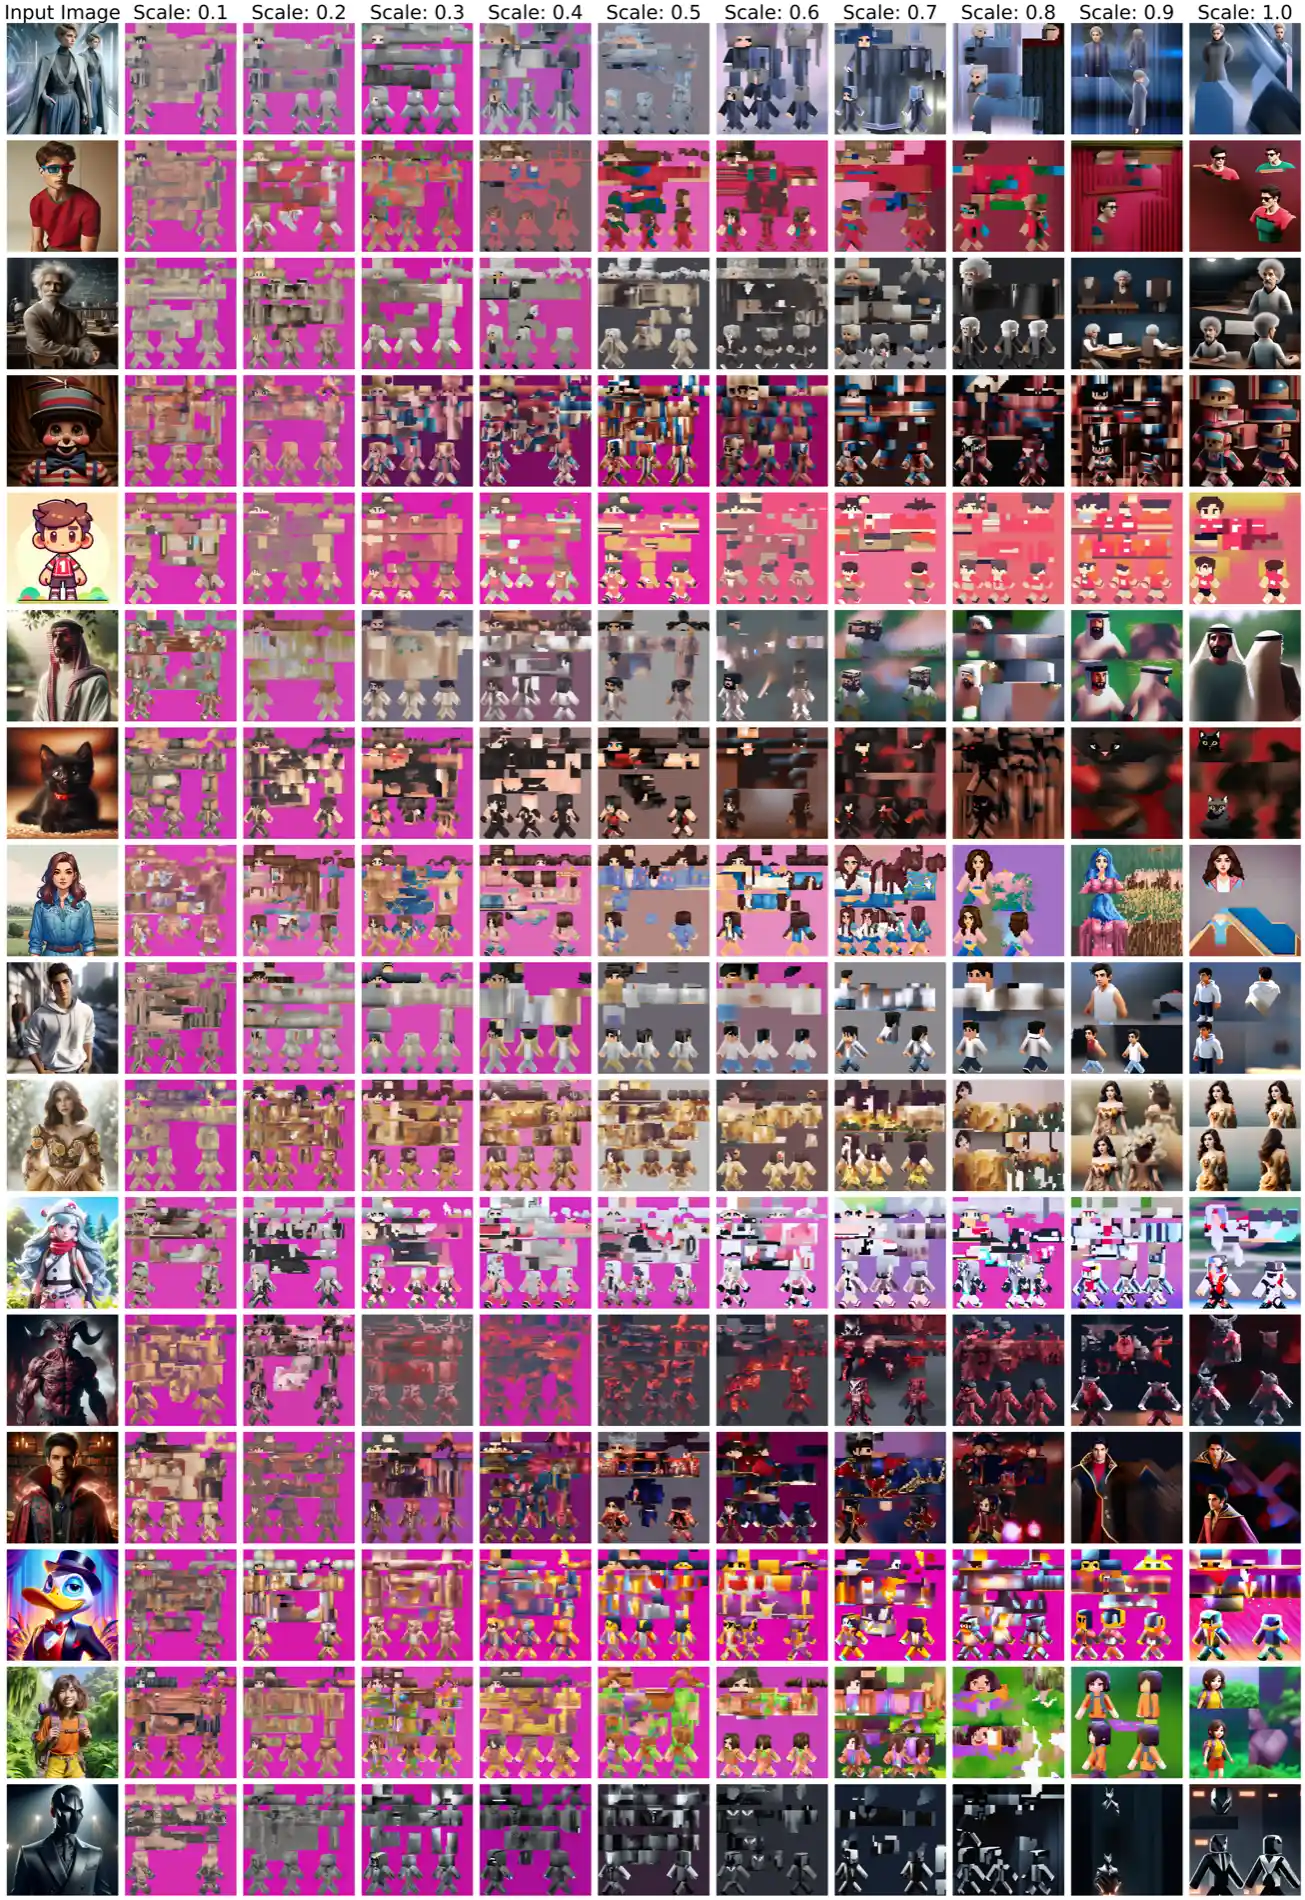
SDXL IP Adapter Scale Experiment (30 steps)
Base Model: monadical-labs/minecraft-skin-generator-sdxl
IP-Adapter: h94/IP-Adapter/sdxl_models/ip-adapter_sdxl.bin
Prompt: “”
Evaluation Image Names
- data/raw/input/13thdoctor.png
- data/raw/input/3dglasses.png
- data/raw/input/alberteinstein.png
- data/raw/input/balloonboy.png
- data/raw/input/animalcrossingvillager.png
- data/raw/input/arabman.png
- data/raw/input/berlioz.png
- data/raw/input/countrykitty.png
- data/raw/input/creeperboy.png
- data/raw/input/daughterofevil.png
- data/raw/input/dawnpokemon.png
- data/raw/input/demonicmutation.png
- data/raw/input/doctorstrange.png
- data/raw/input/donaldsuit.png
- data/raw/input/doratheexplorer.png
- data/raw/input/frontman.png
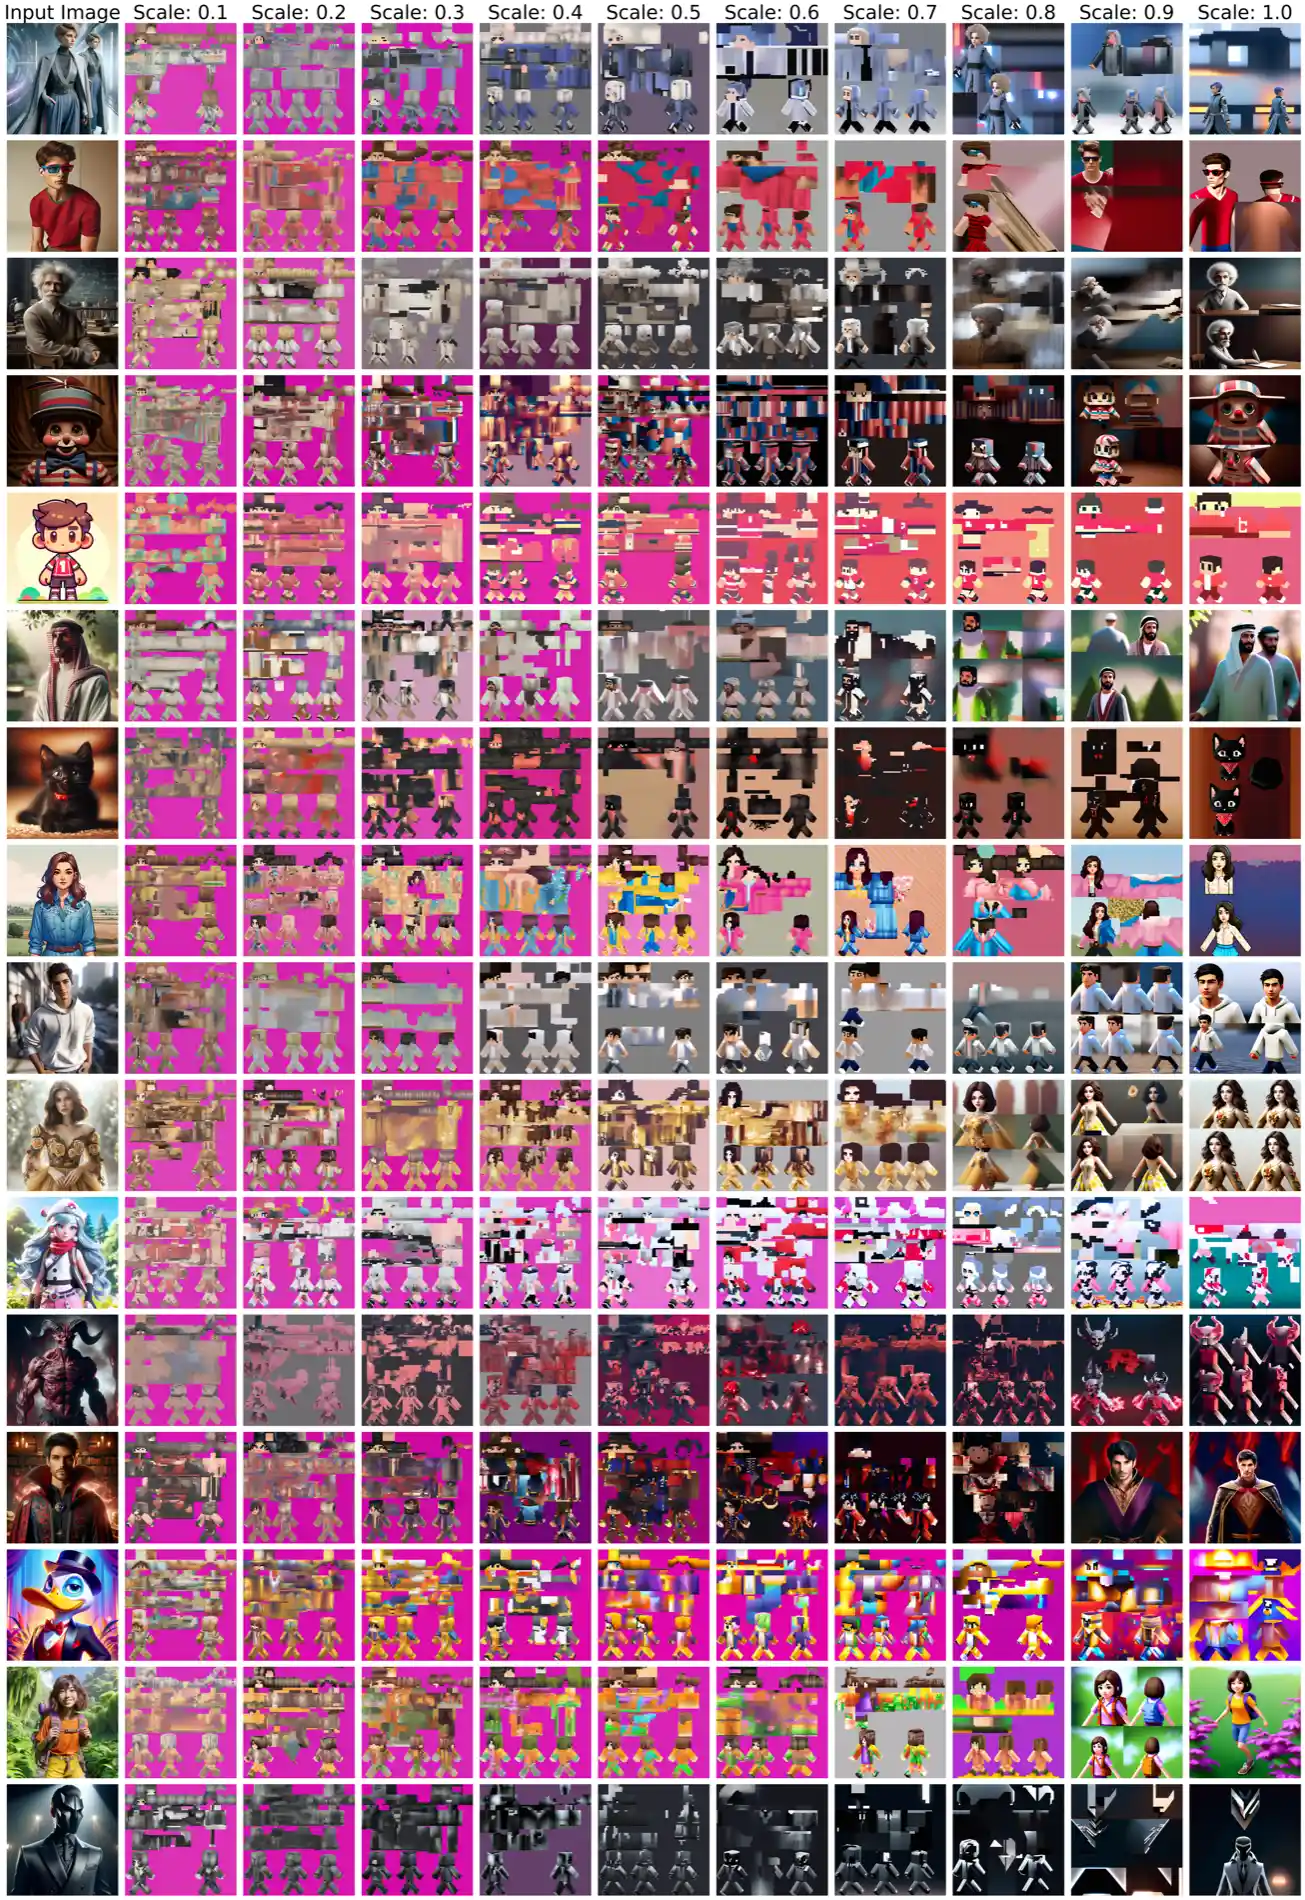
SDXL IP Adapter Scale Experiment (100 steps)
Base Model: monadical-labs/minecraft-skin-generator-sdxl
IP-Adapter: h94/IP-Adapter/sdxl_models/ip-adapter_sdxl.bin
Prompt: “”
Evaluation Image Names
- data/raw/input/13thdoctor.png
- data/raw/input/3dglasses.png
- data/raw/input/alberteinstein.png
- data/raw/input/balloonboy.png
- data/raw/input/animalcrossingvillager.png
- data/raw/input/arabman.png
- data/raw/input/berlioz.png
- data/raw/input/countrykitty.png
- data/raw/input/creeperboy.png
- data/raw/input/daughterofevil.png
- data/raw/input/dawnpokemon.png
- data/raw/input/demonicmutation.png
- data/raw/input/doctorstrange.png
- data/raw/input/donaldsuit.png
- data/raw/input/doratheexplorer.png
- data/raw/input/frontman.png
Resources for future self
Building a Fast Inference Server
While not at all necessary, I think it would be interesting to try and make inference run as fast as possible. This is a fun side project, after all. A few ways to speed up inference:
- Distillation (lossy)
- Adversarial Diffustion Distillation. Implement teacher-student pipeline to teach the distilled model to generate images with very few denoising steps.
- LCM-LoRA is a distillation LoRA which can be dropped in on top of base diffusion model.
- Hardware optimization
- NVIDIA TensorRT
Optimizing Stable Diffusion for TensorRT has proven to be difficult enough to shelve this part of the project for now. I ran into issue - some hardware dependent (limited support for the RTX 5090’s sm_90 module right now), and some software dependent (running nvidia docker in WSL2 sometimes does share CUDA .so files with the running container). The resources refenced for TensorRT optimizations and my notes are stored in the expanble section below.
- NVIDIA Triton Huggingface Tutorial (NVIDIA Triton GitHub): Described the two methods of deploying a model pipline. Single pipeline, or break apart and use TensorRT. Example uses an LLM - not Diffusion model.
- Part 4 - Inference Accceleration: Has useful flowchart and describes using TensorRT’s integration with PyTorch/TensorFlow
- HuggingFace ONNX
- HuggingFace Export to ONNX: Not sure if only for transformers.
- HuggingFace Diffusers Export to ONNX: To export the pipeline in the ONNX format offline and use it later for inference, use the optimum-cli export command:
optimum-cli export onnx --model stable-diffusion-v1-5/stable-diffusion-v1-5 sd_v15_onnx/Then to perform inference (you don’t have to specify export=True again):
from optimum.onnxruntime import ORTStableDiffusionPipeline

model_id = "sd_v15_onnx"
pipeline = ORTStableDiffusionPipeline.from_pretrained(model_id)
prompt = "sailing ship in storm by Leonardo da Vinci"
image = pipeline(prompt).images[0]
- Speed-up Stable Diffusion with TensorRT
- AWS Fast Model Loader in Sagemake Inference: Seems proprietary. Load model weights from s3 instead.
- TensorRT Docs Capabilities: The TensorRT Builder optimizes a model and produces and Engine (offline). The
NetworkDefinitioninterface defines the model. The most common path to transfer a model to TensorRT is to export it from a framework in ONNX format and use TensorRT’s ONNX parser to populate the network definition. TheBuilderConfiginterface is used to specify how TensorRT should optimize the model. Allows you to reduce precision, tradeoff memory for speed, etc. WithNetworkDefinitionandBuilderConfig,Buildercan now create the engine. The Builder creates the Engine in a serialized form called aPlan. Engines are specific to the TensorRT version and the GPU which they were created. During runtime execution, we deserialize a plan to create and engine and create an execution context from the engine.ExecutionContext, created from the engine, is the main interface for invoking inference. Contains all states accosiated with an inference.BuilderFlagallow TensorRT to select lower-precision implementations. - Deploy TensorRT to Triton
- 40% Faster Stable Diffusion XL with TensorRT: Baseten has some good articles.
- Deploying Stable Diffusion Models with Triton and TensorRT
- Stable Diffusion Triton Server (kamalkraj GitHub): Seems quite useful. Small repository and may be incomplete.
-
TensorRT Diffusion Demo (NVIDIA TensorRT GitHub): Has issue running on the RTX 5090?# Running on deepblue with RTX 5090 $ python3 demo_txt2img_xl.py "man wearing a hat" --version xl-1.0 [I] Optimizing ONNX model: onnx/clip2.opt/model.onnx [I] Folding Constants | Pass 1 ['\x1b[38;5;11m'][W] Inference failed. You may want to try enabling partitioning to see better results. Note: Error was: [ONNXRuntimeError] : 1 : FAIL : /onnxruntime_src/onnxruntime/core/graph/model.cc:181 onnxruntime::Model::Model(onnx::ModelProto&&, const onnxruntime::PathString&, const onnxruntime::IOnnxRuntimeOpSchemaRegistryList*, const onnxruntime::logging::Logger&, const onnxruntime::ModelOptions&) Unsupported model IR version: 12, max supported IR version: 10 # Running on Runpod with A6000 48GB GPU [I] Loading bytes from engine/vae.trt10.13.3.9.plan Loading TensorRT engine from bytes: engine/vae.trt10.13.3.9.plan [E] [defaultAllocator.cpp::allocate::57] Error Code 1: Cuda Runtime (In allocate at common/dispatch/defaultAllocator.cpp:57) [W] Requested amount of GPU memory (20132809216 bytes) could not be allocated. There may not be enough free memory for allocation to succeed. [E] [executionContext.cpp::initializeExecutionContext::625] Error Code 2: OutOfMemory (Requested size was 20132809216 bytes.) [W]: engine/unetxl.trt10.13.3.9.plan: Could not find 'timestep' in shape dict {'sample': (2, 4, 128, 128), 'encoder_hidden_states': (2, 77, 2048), 'latent': (2, 4, 128, 128), 'text_embeds': (2, 1280), 'time_ids': (2, 6)}. Using shape (1,) inferred from the engine. Traceback (most recent call last): File "/workspace/TensorRT/demo/Diffusion/demo_txt2img_xl.py", line 150, in <module> demo.loadResources(args.height, args.width, args.batch_size, args.seed) File "/workspace/TensorRT/demo/Diffusion/demo_txt2img_xl.py", line 73, in loadResources self.base.loadResources(image_height, image_width, batch_size, seed) File "/workspace/TensorRT/demo/Diffusion/demo_diffusion/pipeline/stable_diffusion_pipeline.py", line 275, in loadResources self.engine[model_name].allocate_buffers(shape_dict=obj.get_shape_dict(batch_size, image_height, image_width), device=self.device) File "/workspace/TensorRT/demo/Diffusion/demo_diffusion/engine.py", line 301, in allocate_buffers self.context.set_input_shape(name, shape) ^^^^^^^^^^^^^^^^^^^^^^^^^^^^ AttributeError: 'NoneType' object has no attribute 'set_input_shape'
Exporting model to ONNX
pip install optimum[onnx] onnx onnxruntime
optimum-cli export onnx --model deepwaterhorizon/minecraft-skin-model sd_mc_onnx/